Light Trail Photography
How To Do Light Trail Photography
Long-exposure photography is a wonderful thing and honestly one of my favourite genres to experiment with. Not only can you create silky smooth waterfalls, stunning cloudscapes, star trails and more, but long-exposure photography also lets you capture the movement of light. When doing light trail photography, the goal is to keep the shutter open long enough to record the light of vehicles passing through the frame.
Gear You Should Bring for Light Trail Photography
Just look at the amazing light trail images created by Astronaut Don Pettit in space. If he was able to do it while floating, so can you with a few simple pieces of equipment. To do light trail photography, you first need a camera that allows you to shoot in manual or shutter priority mode. And to get crisp, shake-free images make sure you don’t forget a sturdy tripod and a remote shutter release
I always have an ND filter with me as well when I shoot long exposures. That way I’m not entirely dependent on the light and can achieve exactly the aperture and shutter speed I want. My favourite is a 3-stop ND filter, which usually serves me really well at the time of day I prefer to shoot.
Settings You Should Use for Light Trail Photography
What applies to long exposures also applies to light trail photography. Keep your ISO at 100 and shoot in RAW format. This will help you achieve that noise-free look and make things a lot easier in post-processing. As for aperture, I’d use something in the midrange, say f/9 to f/11, and only go higher or lower if you need a longer or shorter exposure. Shutter speed depends entirely on the look you want to achieve, but personally, I prefer an unbroken look and try to expose for around 10-20 seconds, sometimes even longer.
Obviously, light trails are naturally very bright. Be careful that no other highlights in your image, such as street lamps, are blown out though. Too bright lights and white spots can easily ruin an image. To avoid overexposed areas either take a look at your histogram or take a test shot and adjust from there.
What Influences the Look of Your Light Trails
How the glowing lines will end up looking in your photo depends on several factors.
- The flow of traffic: For light trail photography, find a location where vehicles don’t have to slow down and stop, such as a stop sign or a traffic light. Instead, the traffic should flow freely and there should be enough vehicles to create a nice dense trail. One single car might leave a weak and squiggly line, but if you add several of them together, suddenly the light trails end up looking much more powerful. Intersections can be very interesting to shoot, but be aware that exposure times have to be longer to compensate for stopped traffic.
- The colour of the lights: Ideally, find a road with traffic flowing in both directions. That way you will get the glow of the red tail lights as well as the yellow lines created by the headlights. Many vehicles, such as busses and trains, have different coloured lights as well and adding some green and blue into the mix can really enhance your image.
- Bends and bumps in the road: Observe the traffic for a few minutes and line up your shot to create interesting bends and patterns in the light trails. Similarly, watch out for bumpy roads. When vehicles are bouncing up and down due to uneven pavement, this movement will show up in the light trails.
- The length of your exposure: The longer your exposure, the more lights will pile up in your image, creating denser and more powerful light trails. But light trail photography doesn’t mean the more the better. Shorter exposures can create a completely different look entirely and you can experiment with gaps and dots.
Finally, framing, finding leading lines, thinking about foregrounds and backgrounds and adding points of interest are also important aspects of creating a stunning light trail photo. Capturing just the trails is a bit boring, so make sure to keep the rules of composition in mind. Remember though, the goal is to add to the image, not distract from it.
Twilight is Best
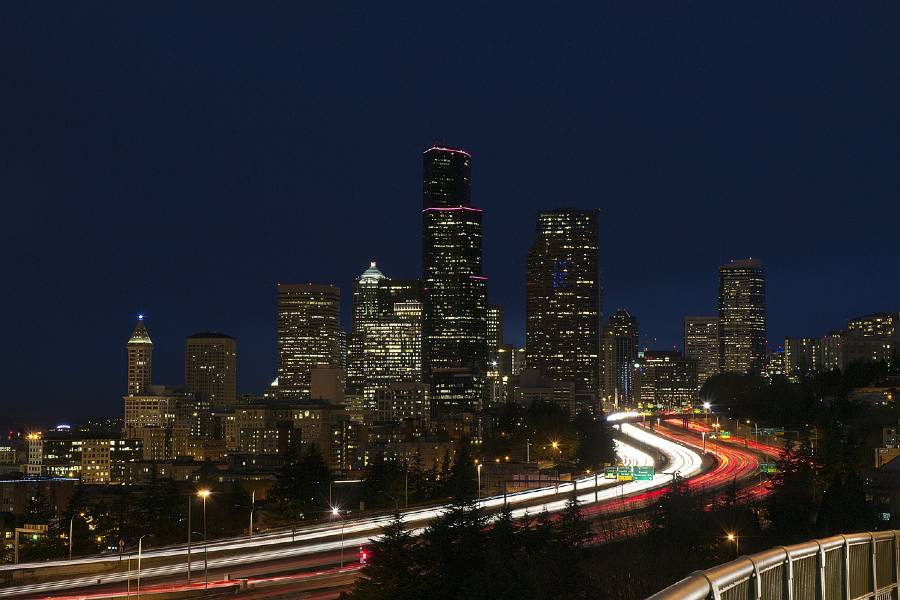
It is no secret that, with some exceptions, I keep most of my photographic activity limited to the golden and blue hours. Similarly, even though light trail photography might indicate a night shoot, I’m not a fan of light trails in pitch-black darkness. I prefer to create light trails during the blue hour when it’s dark enough for a longer exposure and the beautiful blue colour of twilight adds some additional interest and vibrance to the sky.
As I previously mentioned, the look of the light trails depends on how many vehicles are moving, how fast they are going and how long your shutter speed. In the earlier blue hour, you might have to add an ND filter to your lens to add a couple of seconds to your exposure if you need it.
But Timing is Everything
It can be a bit tricky trying to press the shutter release just before a vehicle enters the shot and set the exposure long enough for it to pass through the whole frame. Sometimes, creating light trails involves some waiting around until the flow of traffic and the combination of vehicles is just right.
The most important part of light trail photography is to experiment though. No two images will look the same, so head out there, don’t forget to keep moving and have fun!